Monday, April 29, 2013

Painting the Town

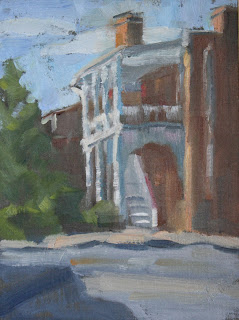
"Behind Valley Street"
8 x 6

I have just returned from a week in Virginia. The weather was fantastic, and I took full advantage of the clear skies and crisp air to do some plein air painting. As usual, I had some "wipe outs", as well as some keepers.

Here's a photo of my setup one day:


I don't want to post images of everything I painted, because I am saving some pieces to be  "unveiled" at my show next month. But in case you are interested in a little preview, the painting above, entitled "Behind Valley Street", is one of my favorites from the week's work.


Friday, April 26, 2013

This Just In!


Ribbons of Red by Lesley Powell Oil ~ 24 x 24
"Ribbons of Red"
24 x 24
 
I am excited to announce that my painting "Ribbons of Red" has just been accepted into the American Women Artists 2013 Associate Member Juried Competition. The competition was open to all Associate Members of AWA nationwide, so I am grateful to have made the cut. I will post more details as soon as practicable, but meanwhile you can read more about the painting here.


Tuesday, April 23, 2013

Torrit Grey


I just made a wonderful new discovery--Torrit Grey. I was befuddled by the promotion at my art supply store, which promised me a free tube of Torrit Grey paint if I bought a certain amount of goods. I did some research, and here's what I found out.

Gamblin Artists Colors is one of the large paint manufacturers in the US. Their factory uses an air filtration system made by a company called Torit. The air filters trap dry pigments that escape into the air during the paint mixing process. Every spring, Gamblin cleans out its air filters. Instead of taking  the pigment dust from the filters and dumping it in the landfill, they use it to make a special paint, which they call "Torrit Grey". Isn't that the coolest thing?

Because the combination of pigments cleaned out of the filters is never the same from year to year, the color Torrit Grey is never the same either. Recently, Gamblin has started labeling the tubes of Torrit Grey with the year of manufacture. So now we painters can collect tubes from various "vintage years", if you will, just like we would collect wines from different vintage years. It's a limited edition pigment!

Not only is Gamblin's approach very earth-friendly, it has the added lure of the mysterious: You never know what the next batch will be like until you open it. I am loving the 2013 batch---a beautiful dark grey, it makes a lovely soft grey when mixed with white. It almost has a slight violet cast...see photo below.


Torrit Grey is also great mixed with other colors. In his book "Landscape Painting Inside & Out", Kevin Macpherson advocates for scraping your palette as you work, and stashing the scrapings on the side, to be used in mixing other colors. Many painters call this their "mud". Kevin even suggests buying empty tubes and filling them with your mud, rather than discarding it at the end of a painting session...another great recycling idea.

Kevin notes that the mud will necessarily be in harmony with your primary colors, since they are mixtures of the colors on your palette. I'm not sure whether that theory of color harmony would hold true with Torrit Grey, but I plan to experiment and find out. Here is a painting into which I incorporated some Torrit Grey. Stay tuned for more!


"Edouard's Bouquet"
16 x 20


Monday, April 15, 2013

Radish Series

"Radish Redux"
6 x 8

One of my first posts this year was on the topic of working in series. Lately I have been at it again, with a series of still life paintings of radishes. I enjoy painting radishes--but, as is the case with most foliage, the green parts can wilt pretty quickly under the heat of my studio lights. (Carol Marine had a recent post on how to minimize the effects of the heat from studio lighting, which I recommend to fellow painters who might be interested in that sort of thing).

After finishing the painting above, the greens were pretty limp, so I bought some fresh new "Easter Egg Radishes". I painted them twice, on panels of two different sizes, and also from two different perspectives. I was walking around the studio when I caught a glimpse of the first setup, looking back into the light. I loved the look of the backlit radishes, and the foreshortening of the subject as it reached back into space. Voila, my third radish painting! (You can read more about this painting here).


"Backlit Radishes"
8 x 8
SOLD

I made a note to myself that I should always walk all the way around the still life setup before I start painting. There is often a surprise composition hiding in plain sight, which may be even better than the one intentionally set up. Come to think of it, this is the same lesson I wrote about in my post "Keeping an Open Mind". It's always good to be open to a change of plan when you see something that is visually exciting.

"Multicolored Radishes"
SOLD


Monday, April 8, 2013

Wipe Out!


I once heard somebody explain the difference between professional photographers and the rest of us -- the professionals only show 1% of the photos they shoot. 

I don't think that the "reject rate" for professional painters is as high as 99%, but I do know that all painters create some bad paintings from time to time. Jane Barton recently wrote a wonderful post on this topic, entitled "Is there a Heaven for Paintings?" She talked about what becomes of unsuccessful paintings. She offered many suggestions, including cutting up old canvases to make bookmarks for friends. The bookmarks idea is by far the most creative and unusual reincarnation I have heard of for old paintings!

Several years ago I attended a workshop with Kevin Macpherson. If you are not familiar with Kevin, it may give you some idea of his stature to know that he is a Master Signature Member of OPA (Oil Painters of America), and a Master Artist in the AIS (American Impressionist Society). Kevin told us that he built a bonfire at the end of every year, and experienced the catharsis of throwing his bad canvases into the flames. But first he would cut out successful parts of the canvases...little fragments that would become seeds of future paintings. Now if an artist like Kevin Macpherson has failed paintings, I know that I am in very good company when mine fall flat! And it's encouraging to know that even in defeat, one can find the seeds of success.

I have discovered that one of the highest and best uses of my failed paintings is to turn the canvases upside down, sand them down a bit, and paint over them. Here is a photo of a canvas being put to that use:


I don't even remember what the original subject was, but I loved working over the old painting. I like having something to "work against". Plus the old painting sometimes gives me great clues for improving the new one. I occasionally have the fun of letting some of the old painting peek through the finished new painting.

The image below is the final product from this "paint over". I would never have chosen some of the beautiful oranges in this one had it not been for nudges given me by the failed painting underneath.

"Winter Sun in the Living Room"
18 x 18
NFS

I often paint on oil primed linen panels. When I realize that a fresh painting is beyond salvation, I just wipe it off. The wiped down panel is usually a nice, neutral, medium toned grey. A perfect surface for the next painting. When my husband asks what I painted that day, I say "It was a wipe out". And I mean it both literally and figuratively. But then, tomorrow is another day, as a famous Southern belle once said.


Tuesday, April 2, 2013

Not Too Edgy

"Bialetti"
11 x 14

We painters spend a lot of time fretting about "edges". In fact, I believe that one of the key elements of a successful painting is varying the treatment of edges, and making the right choices as to which edges should be "hard" and which ones "soft".  

Sometimes an edge can be made so soft that it virtually disappears. These are what we call "lost edges"--places where there is literally no delineation between two objects. I love to find opportunities to lose edges. It is amazing how little definition between objects is actually required, because the viewer's brain will fill in lots of missing information. 

In this painting, I challenged myself to create a number of lost edges. I managed to completely lose the left edge of the tall vessel behind the Bialetti coffee maker, letting it blend right in with the background, as you see can in this detail:


I loved this edge treatment...it helped move the tall vessel into the background, and the sharp, hard edge of the Bialetti spout comes forward by comparison.

I also lost the right edge of the little yellow pitcher, letting it fade in to the larger pitcher behind it (detail below):


I saved the crisp edges in this painting for the Bialetti coffee maker, which is the main subject, and for the spouts of the various containers, which are all pointing inward to draw the eye in. Great fun. 

One could make a game of counting the hard and soft edges in this painting. Lori Woodward says that the mark of a professional painting is that it includes several lost edges. I wonder whether she would find that this painting makes the mark?

By the way, if you notice the reddish hue on one of the surfaces of the Bialetti, it is a reflection from the red apron I was wearing while working on the painting. So there is a hint of a self portrait in this canvas!

Here's another painting featuring my little Bialetti coffee maker. See if you can find the lost edges in this one!

"Italian Breakfast"
12 x 16